GPU Passthrough on Proxmox VE
Guide to using the Passthrough GPU on Proxmox VE.


Contents:
- 1-What's passthrough?
- 2-Requirements
- 3-Enabling IOMMU
- 4-Intel HD
- 5-AMD R5 240
- 6-AMD RX 6400
1-What's passthrough?
Passthrough allows virtual machines to access a machine's physical devices. This can be :
- USB devices (keyboard, mouse, hard disk, USB stick, webcam, etc.)
- SATA devices (hard disk, SSD)
- PCI peripherals (graphics card, RAID card, network caret, etc.)
- Processor graphics (Intel HD)
The advantages are manifold:
- The virtual machine has direct access to the peripheral's resources, and no longer has to rely on para-virtualization drivers such as VirtIO.
- In the case of a graphics card, the virtual machine's video signal can be transmitted to your monitor.
- In the case of network cards, you no longer need to buy a dedicated router/firewall and integrate it into your server.
- And finally, in the case of hard disks/SSDs, the virtual machine has access to the SMART and performance is close to that of a system installed on bare metal.
Here's one of the most popular use cases for passthrough. In the video below, the user connects his graphics card to his virtual machine and then, with the help of a Steam Link box, retrieves the stream to stream it to his TV.
Note: this requires the graphics card to have a hardware encoder, which is not always the case.
2-Requirements
You need :
- A server running Proxmox VE
- an Intel VT-d-compatible processor and chipset
- Intel-VT-d instruction enabled in BIOS settings
- A virtual machine running Windows 10/11 or Linux (for Intel HD)

For the purposes of this tutorial, I've used a Dell Optiplex 7020 SFF which features Intel-VT-d instructions at chipset and processor level.
3-Enable IOMMU
Start by enabling IOMMU, which is essential for transmitting a PCI device to a virtual machine.
 Contributors to Wikimedia projects
Open the grub file.
nano /etc/default/grubAnd add the line "quiet intel_iommu=on" to enable iommu (Input-output memory management unit) features.
GRUB_CMDLINE_LINUX_DEFAULT="quiet intel_iommu=on"Then update the grub.
update-grub4-Intel HD
This tutorial works only for Linux distributions, not for Windows, which will be the subject of a tutorial once I've found the solution.
Works with Intel Core 1th gen, 2th gen, 3th gen and 4th gen processors. I haven't tested beyond that for lack of hardware.
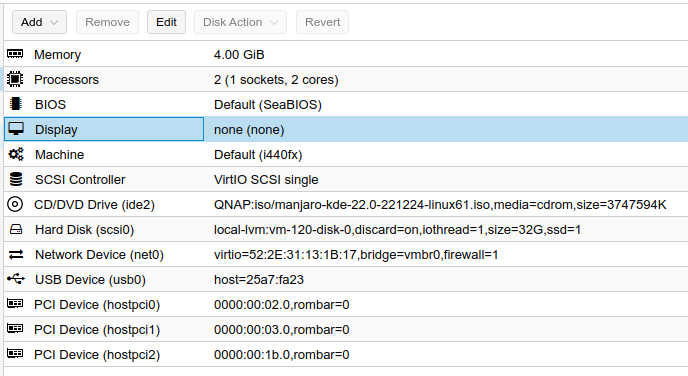
Create a Linux virtual machine (whatever the distro), go to Hardware and click on "Add". We'll test Manjaro as an example.
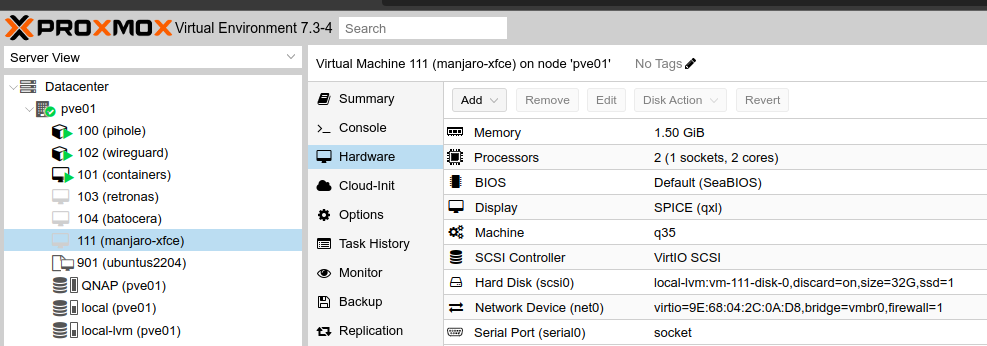
Then add peripherals 1 and 2:
- Xeon E3-1200 v3 Processor Integrated Graphics Controller: Intel HD graphics circuitry
- Xeon E3-1200 v3/4th Gen Core Processor HD Audio Controller: processor audio device

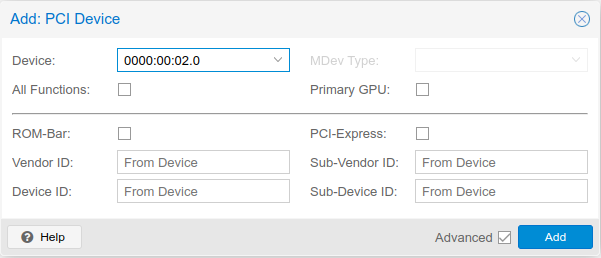
Everything must be unchecked, so uncheck "ROM Bar" and click "Add" to add the two devices.

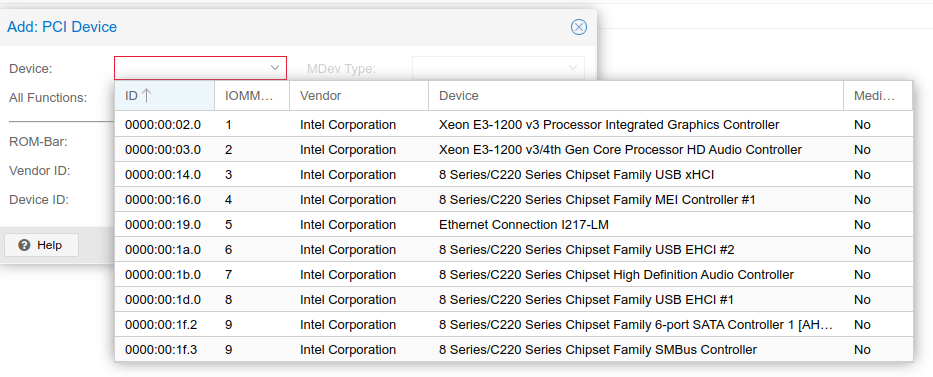
Also add peripheral 7, which corresponds to the motherboard audio controller often found on Lenovo, Dell and HP professional PCs.
I've noticed that without adding this device, no sound comes out and video jerks.
Finally, make sure "Display" is set to "None" to avoid disturbing the display on your monitor with the SPICE or VNC driver.

It should look like this.
Switch on your monitor and start your virtual machine.
For example, with a simple office workstation, you can display two systems on two screens if, in addition to Intel HD graphics, you have an AMD or Nvidia card. Ideal in times of energy sobriety.
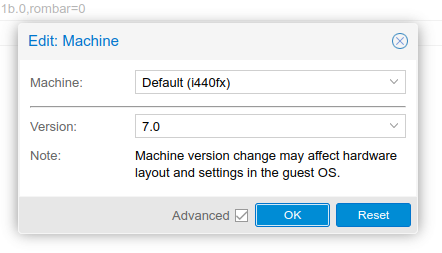
No problems with traditional Linux desktop distributions, but I've come across a specific case since the latest PVE updates.
With Batocera (fork of Recalbox), I'm obliged to opt for version 7.0 of i440fx because no passthrough with 7.1 and the "latest" (I haven't found the right method yet).
This only applies to Intel HD graphics, not to Nvidia or AMD cards.
5-AMD R5 240
With AMD, there are no restrictions. Passthrough works with both consumer and professional cards.
This avoids the following inconveniences:
- No error 43
- No need to isolate the card via server bios and PVE
- No need for arguments in configuration files to trick the card
We're going to carry out a test with an AMD R5 240, a low-profile card available for 30 euros on Ebay.
It's a card I recommend for a number of reasons:
- DirectX 12 (11.1), OpenGL 4.6, OpenCL 1.2 and Vulkan 1.2 compatible
- Ubuntu, RHEL, WIndows 7/8/8.1/10/11 compatible
- Last update: 23/6/2022
Ideal for office workstations in SFF format
I use it to display my various Linux distributions, Windows 11 and Batocera.
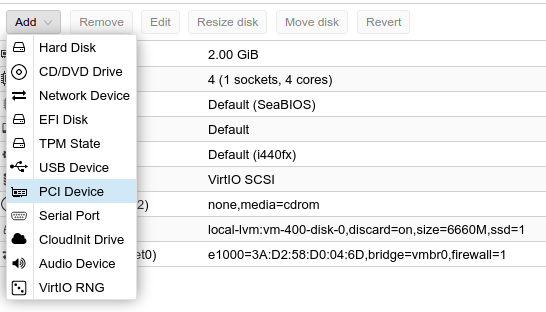
Create a Linux virtual machine (whatever the distro), go to Hardware and click on "Add". We'll test Manjaro for the example.
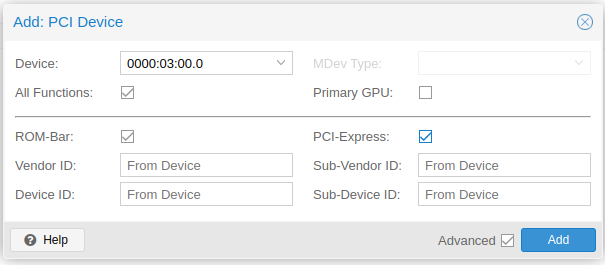
In the virtual machine parameters, add a PCI device.
Choose your graphics card (0000:01:00.0 for me).
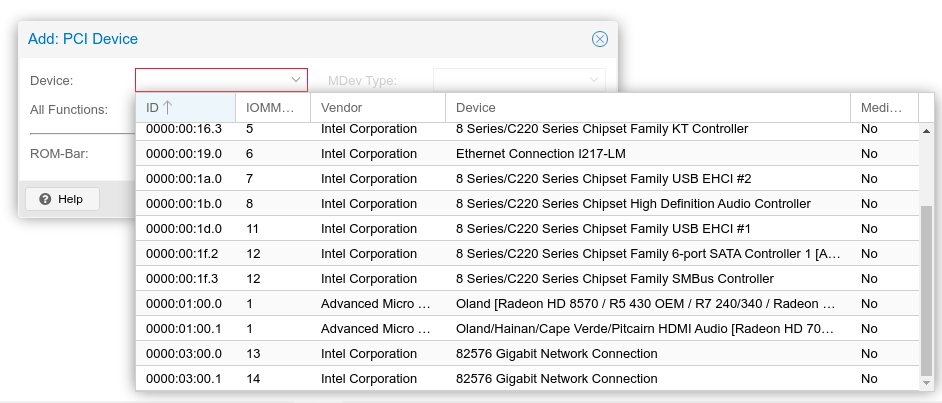
Then activate all options (All functions, ROM Bar, Primary GPU and PCI-Express).
Note: if your virtual machine is configured on i440fx, you can't check the PCI-Express option (available only on Q35), which is ESSENTIAL for passthrough to work.

Switch on your monitor and start your virtual machine. Congratulations! Your virtual machine is finally ready.
6-AMD RX 6400
With AMD, there are no restrictions. Passthrough works with both consumer and professional cards, but unlike the previous tutorial on the R5 240 (see link below), the RX 6400 requires isolation from the host system.
The RX 6400 is AMD's latest low-profile card. It has the luxury of being both more powerful and less expensive than Nvidia's GTX 1650, while consuming less power and requiring only one slot, which means it can be used on many professional desktops where the PCIE x16 slot is located on the power supply side, making it impossible to use a 2-slot low-profile graphics card.
I got it second-hand for 121 euros (159 euros new), so I might as well say I jumped at the "opportunity" (it was an easy one).
Here are its specifications:
- 4 GB GDDR6 video memory
- RDNA2 architecture (as on PS5 and XSX)
- PCIE 4.0 port
- 6 nm etching
- TDP of 50 watts on 1 slot
- 8K maximum display resolution
It offers an excellent quality/price/performance ratio, making it ideal for gaming, CAD and 3D imaging.
The big drawback is that it has no hardware encoder, so it's impossible to stream games via Steam or Parsec to other peripherals.
Here's a selection of videos about this card. The first is particularly complimentary.
6.1-Blacklisting the driver
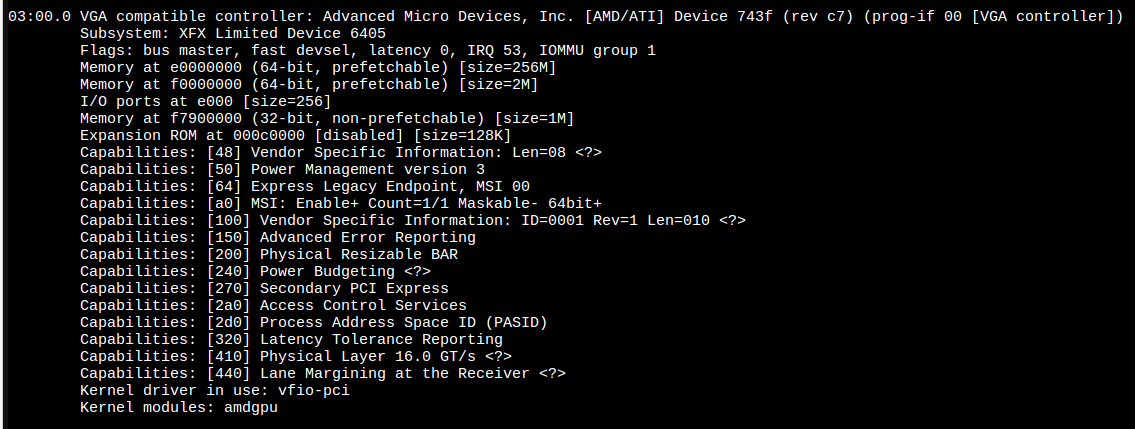
Type the command "lspci -v" and go to the AMD periperary. In "Kernel modules", it says "amdgpu".
Create a "blacklist.conf" file.
nano /etc/modprobe.d/blacklist.confYou will need to blacklist the device driver in the "blacklist.conf" file by typing the following line.
blacklist amdgpu6.2-Enabling VFIO
You'll need to add new functionalities to the kernel. Open the "modules" file.
nano /etc/modulesSpecify the following modules to activate VFIO (Virtual Function I/O).
vfio
vfio_iommu_type1
vfio_pci
vfio_virqfd
These modules will be loaded by the Linux kernel when PVE starts up.
Finally, you'll need to add the device to VFIO.
Type the command "lspci" and find your device (03:00 for me).
lspci
Display the Vendor's ID of device 03:00.
lspci -n -s 03:00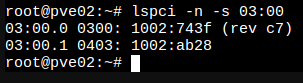
Retrieve the identifiers and issue an "echo" command to add this line to the "vfio.conf" file.
echo "options vfio-pci ids=1002:743f,1002:ab28 disable_vga=1"> /etc/modprobe.d/vfio.confUpdate the initial file system in ram memory (intramfs) to reflect the changes.
update-initramfs -uRestart the server.
rebootCongratulations!!!! You're ready to move on to the next level.
6.3-Windows 11 configuration
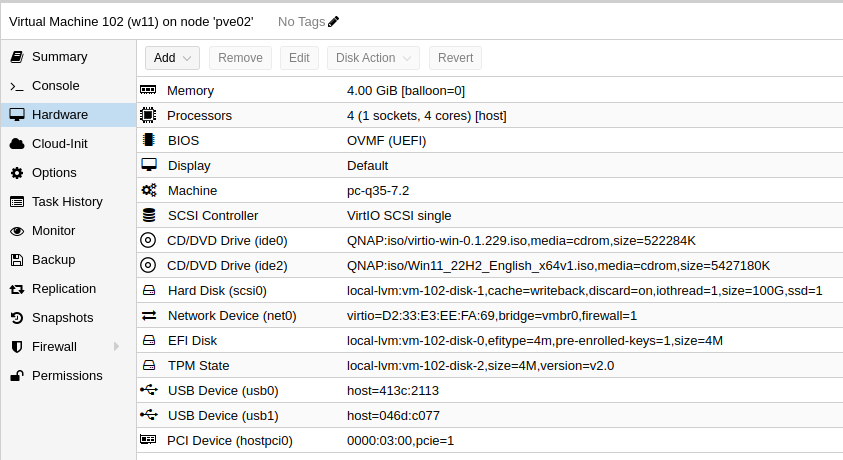
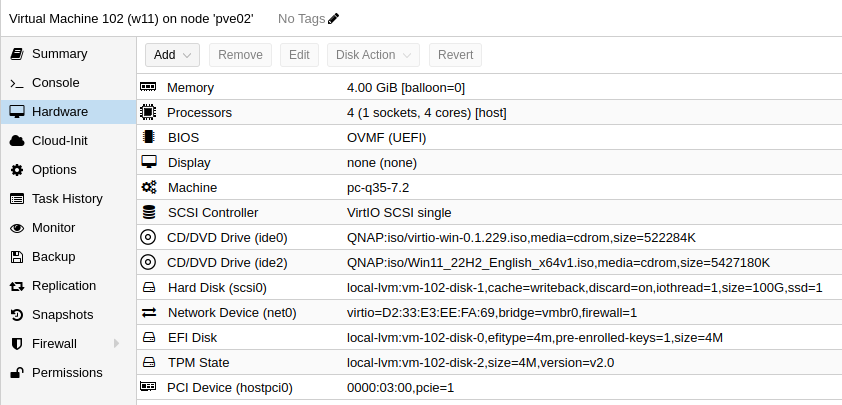
As an example, here's the configuration of my Windows 11 virtual machine as I prepare to install the system. No USB or PCI devices in passthrough at the moment.
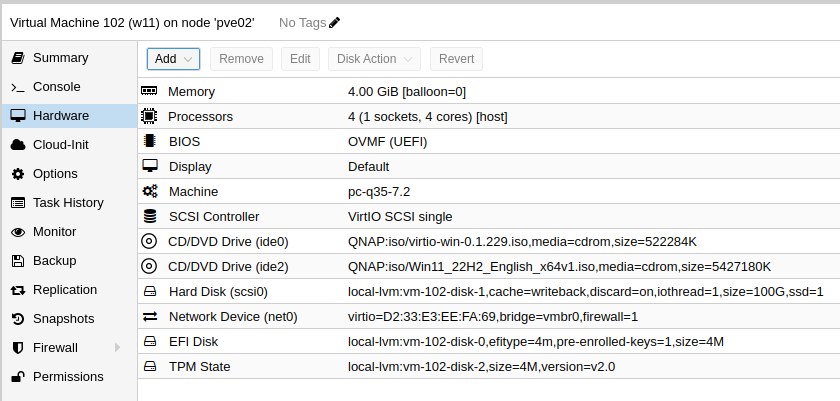
Follow the tutorials above, but NEVER add the graphics card as a PCI device, otherwise you'll end up with a magnificent Blue Screen of Death (BSOD).
Once you've finished installation, you'll need to shut down the virtual machine, add the graphics card and USB peripherals (keyboard, mouse).
You can activate the graphics card either by :
- the NoVNC client integrated into the PVE web interface
- Microsoft's RDP protocol
I recommend NoVNC, but we'll look at both together.
NoVNC
Whereas on Nvidia boards you had to disable NoVNC or you'd get an error code 43, I didn't have to do this for the RX 6400, and it's actually the easiest way to activate the device.
Go to "PCI Device".
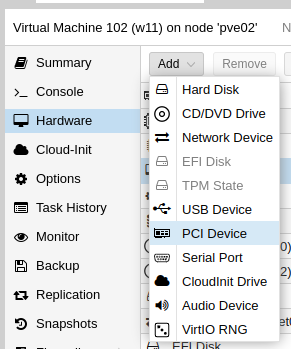
Then add your graphics card. For me, it's device 03:00.
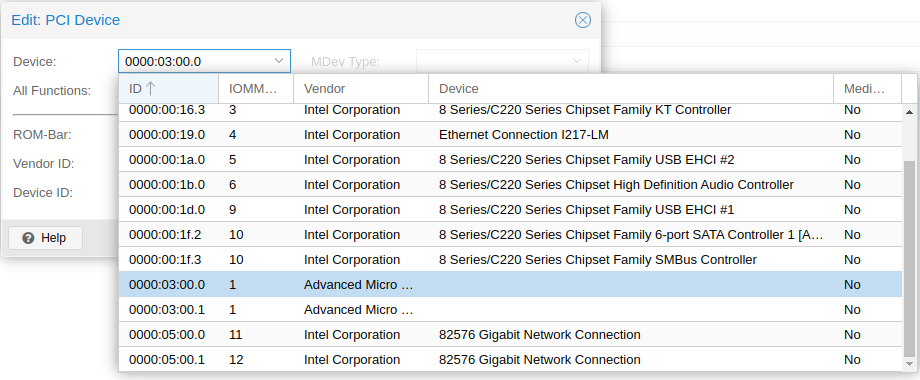
You check everything except "Primary GPU".
You should end up with this configuration.
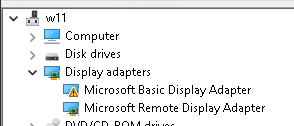
Start your virtual machine and in device management you should see an error code 31 indicating that Windows has not loaded the driver required for this device.
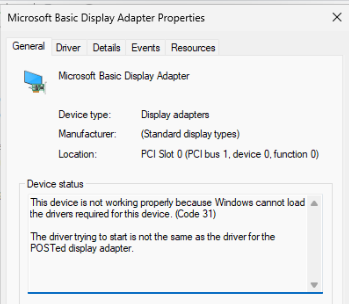
After a few minutes, the pilot settles in.
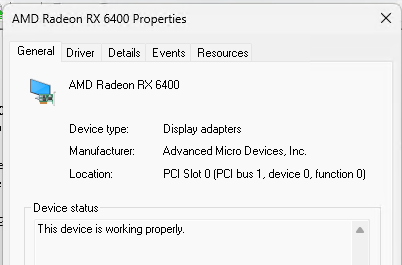
Congratulations!!!! The graphics card should be displayed on your monitor.
RDP
With the RDP protocol (see the bonus section of the Windows 11 tutorial), it's not quite as much fun, because you'll get two error codes and you'll also have to activate the device manually.
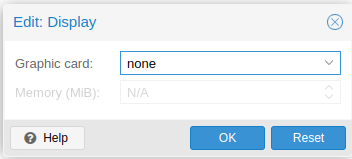
You'll need to go to "Display" and set it to "none" so as not to use VNC by default.
Go to "PCI Device".
Then add your graphics card. For me, it's device 03:00. Check everything except "Primary GPU".
You should end up with this configuration.
Start your virtual machine and in device management you should see an error code 43 indicating a problem (which isn't a problem).
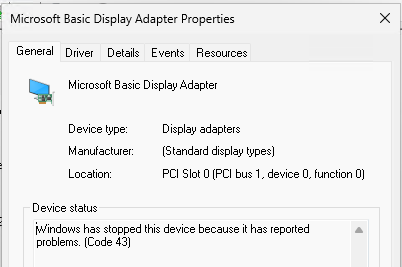
After a few minutes, the pilot settles in.
And you'll get a message asking you to restart (just do it).
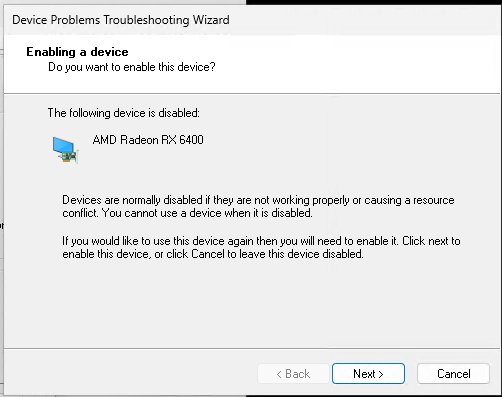
After rebooting, you'll get another error code, this time 22, indicating that the device is disabled.
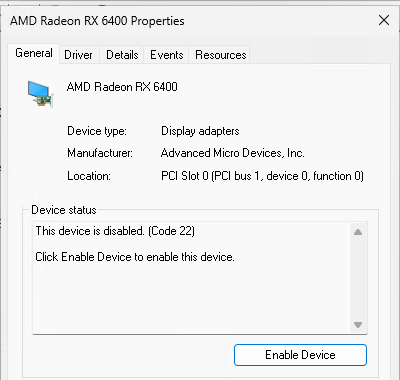
Click on "Enable Device" and then on "Next" to activate the device.
Then press "Finish" to finalize.
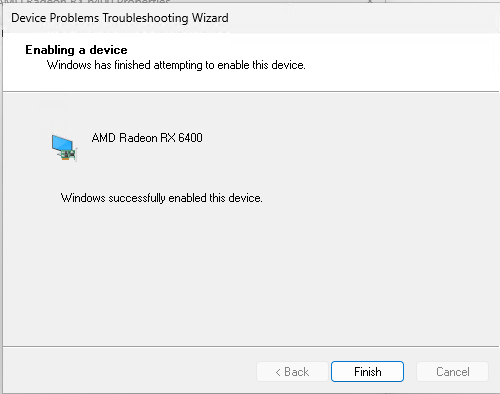
Congratulations!!!! The graphics card should be displayed on your monitor.
Sources :