Linux Bridge features on Proxmox VE
Let's take a look at Linux Bridge, the default SDN for Proxmox VE.


Contents :
- 1-Requirements
- 2-What's Linux Bridge?
- 3-What's a vNIC?
- 4-What's a VLAN?
- 5-VLAN-aware
- 6-Bridge + VLAN
- 7-Bridge without VLAN
- 8-Integrating with Linux Bond
- 9-Mode overview
- 10-Linux Bond + VLAN-Aware
- 11-Linux Bond + Bridge + VLAN
- 12-Linux Bond + Bridge without VLAN
1-Requirements
Prepare a Proxmox VE virtual machine for testing purposes, so you don't have to touch your physical server, most of which have only one physical Ethernet port.
With a virtual machine, you can add as many virtual interfaces as you like.
2-What's Linux Bridge?
Linux Bridge is an SDN (Software Defined Network) that allows you to create bridges (Linux Bridge), virtual networks (Linux VLAN) and aggregate network interfaces (Linux Bond).
It's neither more nor less than a virtual switch, and is one of the most widely used with OVS (Open vSwitch), as well as the easiest to set up (by default on PVE).
A Linux Bridge connects Proxmox VE's virtual network to the physical LAN, like a bridge connecting two shores in real life.
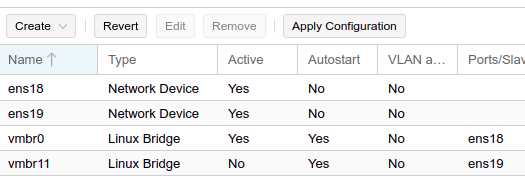
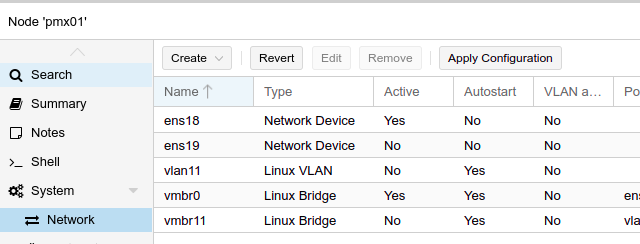
When you first install PVE, it will create the "vmbr0" bridge using the default network port.
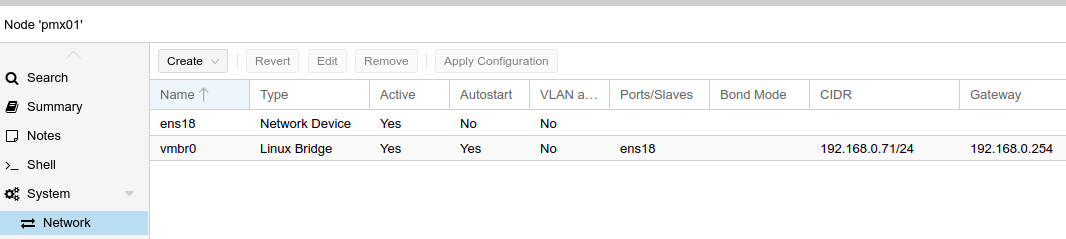
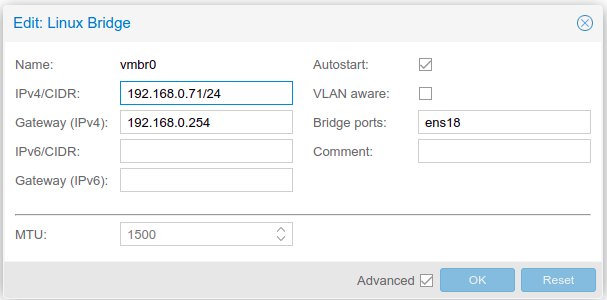
If you look at the configuration of the "vmbr0" bridge, you can observe 3 elements:
- IPV4/CIDR: the IP address is that of the web administration interface
- Gateway (IPv4): the gateway of your local network
- Bridge ports: the network port(s) used by the bridge (ens18)
Here are a few points to remember:
- 4094 bridges per node maximum (you've got room to spare)
- When a bridge is configured on all the nodes in a cluster (e.g. vmbr1 on a 3-node cluster), this allows live migration without interrupting network connectivity
- One bridge per physical port (multiple bridges per physical port are not possible)
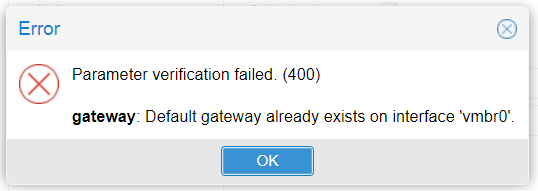
- One bridge per physical port with gateway (otherwise, here's the error message indicating that the "vmbr0" bridge already has one configured (see screenshot below)
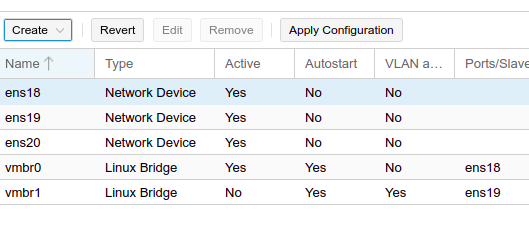
In this case, you've added a dual NIC gigabit ethernet card. You want your virtual machines to be able to access the local network from this card. So you're going to create a bridge for each port (ens19 and ens20).
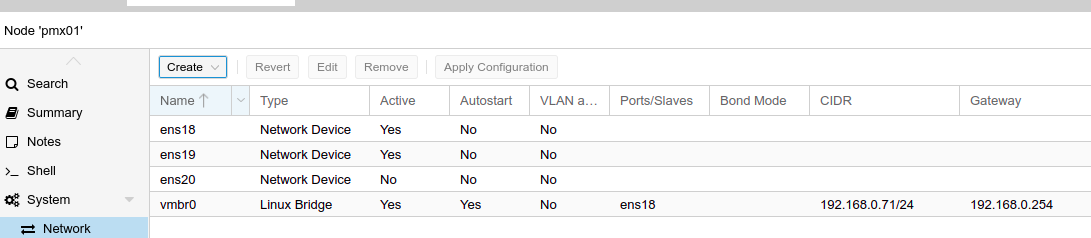
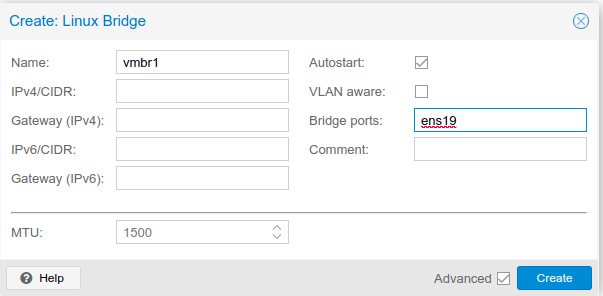
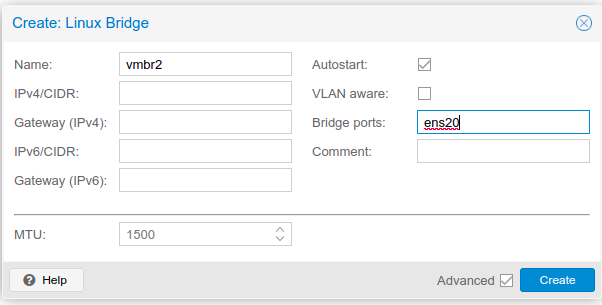

You'll be able to add either the default network interface (vmbr0) or the dual NIC's two network interfaces (vmbr1 and vmbr2) to your virtual machines.
Before going any further, let's take a look at :
- What is a vNIC?
- What is a VLAN?
3-What's a vNIC?
A vNIC (Virtual Network Interface Card) is a virtual network interface commonly found in virtual machines.
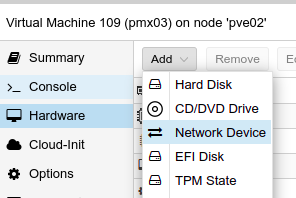
To add one to Proxmox VE, simply go to Hardware/Add/Network Device.

It can be connected and disconnected without rebooting if the hotplug function is enabled in the virtual machine (enabled by default).

For your personal cultivation, there are four vNIC models:
- Intel e1000
- Realtek RTL8139
- VMware vmxnet3
- VirtIO
Intel e1000 and Realtek RTL8139 are emulated models with lower performance but broader compatibility, often used for Windows virtual machines in full virtualization.
VMware vmxnet3 is used when you have a virtual machine in .vmdk format with open-vm-tools installed.
Finally, Red Hat's VirtIO (Virtual Input Output) para-virtualization drivers offer the best performance. They are installed as standard on Linux and BSD distributions, but require manual installation on Windows.
4-What's a VLAN?
A VLAN is a Virtual Local Area Network, a "logical" representation of a traditional network, an abstraction in the same way as virtualization. It is defined by the IEEE 802.1Q standard.
By modifying the Ethernet frame at Layer 2, this standard enables several logical networks (VLANs) to be transported within a single physical link, known in the jargon as a trunk.
This makes it possible to separate flows, segment the network (reducing the size of a broadcast domain) and improve security.
The 802.1Q standard allows the simultaneous creation of up to 4094 VLANs, while VXLAN (VLAN at data center level) allows the creation of up to 16 million VLANs.

Now that you know what a VLAN is, you need to know that there are 3 ways to create one on PVE.
5-VLAN-aware
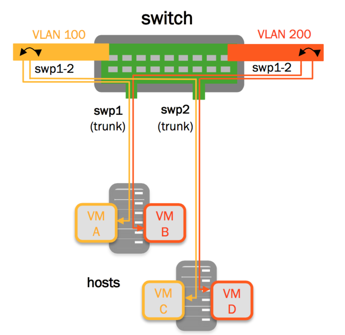
More recent, VLAN-aware allows multiple VLANs to circulate within a bridge. It's also the method used in OVS (Open vSwitch), which is used in all virtualization solutions (KVM, Xen, Hyper-V, ESXi), so you might as well say it's the production standard.
This is very useful, because in a data center, you'll have to manage hundreds or even thousands of VLANs, so administration will be that much simpler.
The disadvantage is that you lose isolation, and the slightest configuration error will render all VLANs inaccessible.....

To be handled with care in production if you don't want to end up with the same thing.

To use VLAN-aware :
- Add a vNIC to your Proxmox VE virtual machine,
- You'll see a new network interface appear with the name "ens19".
- Create a bridge and give it a name, the interface port (ens19 in the example) and, above all, check the "VLAN aware" box.

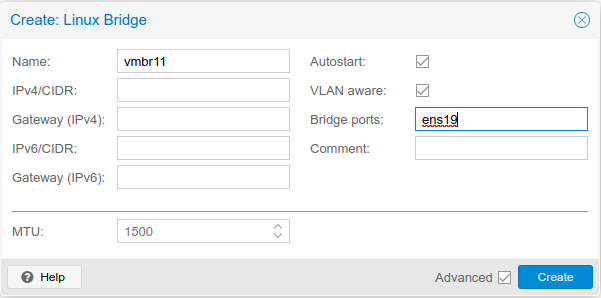
Click on "Apply Configuration
This is how it looks via the CLI.
auto vmbr1
iface vmbr1 inet manual
        bridge-ports ens19
        bridge-stp off
        bridge-fd 0
        bridge-vlan-aware yes
        bridge-vids 2-4094
Let's take a look at the following options:
- bridge-ports: the port used (ens19),
- bridge-stp (Spanning Tree Protocol): enables or disables bridge discovery to avoid loops, which provides better routing but can pose security problems if one or more bridges are isolated from the network, so it is disabled by default,
- bridge-fd (forwarding delay): defines the delay before the interface is ready (default 0),
- bridge-vlan-aware: enables or disables the function (yes or no),
- bridge-vids: indicates the range of vlans allowed (from 1 to 4094 if you wish),
For this last option, start by defining a range of 5 VLANs (1-5).
Here's the final result.
auto vmbr1
iface vmbr1 inet manual
        bridge-ports ens19
        bridge-stp off
        bridge-fd 0
        bridge-vlan-aware yes
        bridge-vids 1-5
Update via CLI or GUI by clicking on "Apply Configuration".
Or use the command "ifup + bridge name".
ifup vmbr1Find out more about VLAN-aware :
Now to bridge + VLAN.
6-Bridge + VLAN
This was the old method. Compared with VLAN-aware, you get better isolation, because in the event of misconfiguration, only the VLAN concerned will be impacted, not all VLANs.
The downside is that it's extremely complicated to manage in data centers containing hundreds or even thousands of servers. Don't forget, you can create 4094 Linux Bridge bridges per node, and if one of them goes down, good luck finding it the first time (it will take a little longer than with VLAN-aware).

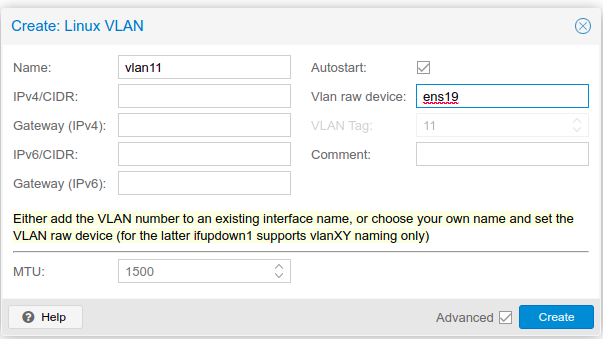
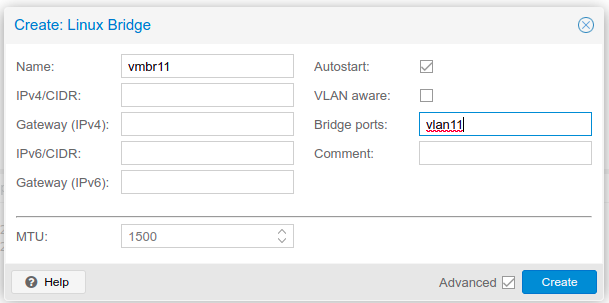
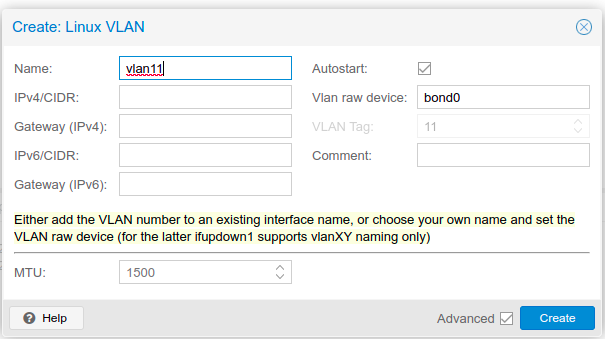
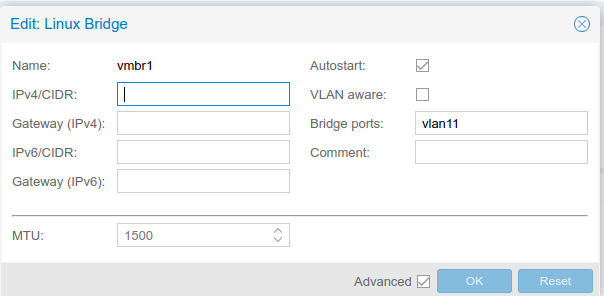
To create a bridge+VLAN combination:
- Create a VLAN named "vlan11" by selecting your network interface (ens19)
- Delete the previous bridge
- Then create a new bridge named "vmbr11", based on the configuration of "vlan11" (do not check the "VLAN aware" box, of course)
- Click on "Apply Configuration"
And that's it! Here's the CLI configuration to be added to /etc/network/interfaces.
auto vmbr11
iface vmbr11 inet manual
        bridge-ports vlan11
        bridge-stp off
        bridge-fd 0

auto vlan11
iface vlan11 inet manual
        vlan-raw-device ens19
Find out more about Traditional Bridge Mode.
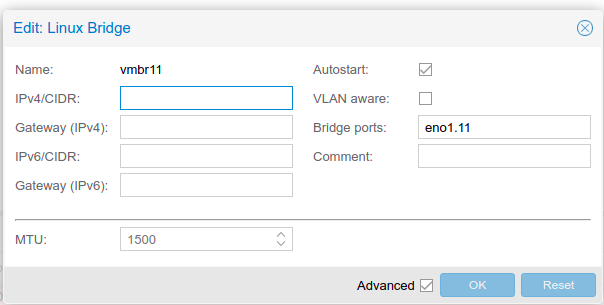
7-Bridge without VLAN
With this method, you don't have to create a VLAN every time you resume a bridge.
To create one :
- Delete the previous bridge
- Create a "vmbr11" bridge (for vlan11)
- Enter "ens19" in the network interface
- Just after "ens19", add a dot and the VLAN number (ens19.11 for VLAN 11)
Did you think it was finished? Big mistake!!!!

You can use these 3 methods by aggregating network interfaces with Linux Bond.
Having reviewed Linux Bridge and the 3 ways of managing VLANs, let's take a closer look at bonding and its various modes.
8-Aggregate with Linux Bond
Linux Bond lets you aggregate several physical network interfaces using the "bonding" technique.
The advantages are numerous:
- No SPOF (Single Point of Failure).
- High availability in the event of failure of one of the network interfaces.
- Increased bandwidth.
- Load balancing.
- It complies with the IEEE 802.3ad standard.
It is widely used in data centers, where network slowdowns and outages are to be avoided as far as possible.
9-Mode overview
Linux Bond supports a total of 7 modes.
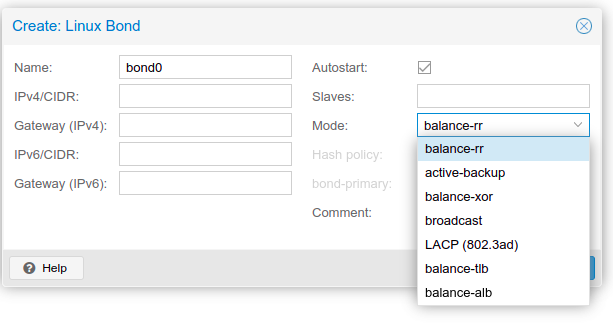
Bear in mind that, according to Wasim Ahmed, author of the book "Mastering Proxmox VE", the most commonly used modes in production are :
- balance-rr.
- active-backup.
- LACP (802.3ad).
Let's take a look at these 7 shades of G....d'agrégation!!! d'agrégation (I digress, I digress).
mode 1: balance-rr (round robin)
Packets are transmitted sequentially from the first network interface to the last.
For example :
- Packet 1 to vNIC 1
- Packet 2 to vNIC 2
- Packet 3 to vNIC 3
And so on.
If a network interface doesn't respond, it will be ignored and packets will be forwarded to the next one.
The benefits are increased overall bandwidth, fault tolerance and load balancing.
What's more, no special switches are required.
The only drawback is packet loss.
mode 2: active-backup
Only one participating network interface is active. The next interface becomes active when the previous one fails.
This provides fault tolerance but no load balancing.
mode 3: balance-xor
This mode selects the same network interface for each destination MAC address.
Example: if VM A (MAC address A) wishes to communicate with VM B (MAC address B), the xor algorithm will calculate and determine the definitive destination vNIC for MAC address A and vice versa.
This mode ensures both fault tolerance and load balancing.
mode 4: broadcast
As its name suggests, broadcast mode transmits packets to all network interfaces.
It therefore provides fault tolerance at the cost of heavier processing for the network interfaces.
mode 5: 802.3ad or LACP (Link Aggregation Control Protocol)
All interfaces are used and share the same speed and duplex parameters.
For example, if you have 4 gigabit ethernet network interfaces, instead of having a cumulative 4 gbit/s, you'll only have 1 gbit/s, but more consistently than if you use a single interface with the same speed.
For this mode to be functional, it requires a specific switch compatible with the 802.3d standard or the LACP function.
mode 6: balance-tlb (Transmit Load balancing)
Outgoing packets are distributed according to the load on each network interface.
Incoming packets are received by the current interface.
This provides both fault tolerance and load balancing.
mode 7: balance-alb (Adaptive Transmit Load balancing)
Balance-alb is the exact opposite of balance-tlb.
Incoming packets are distributed according to the load on each network interface.
Outgoing packets are received by the current interface.
Ditto, it enables both fault tolerance and load balancing.
Now let's see how to set up a VLAN with Linux Bond.
10-Linux Bond + VLAN-Aware
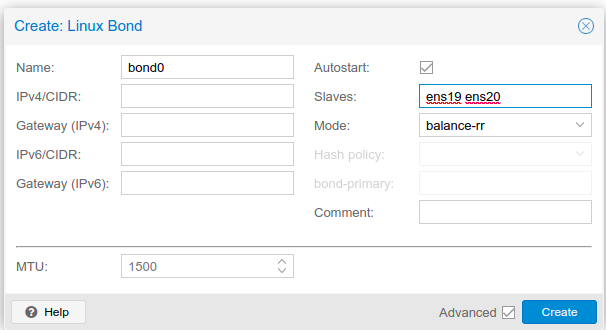
To create a Linux Bond + VLAN-Aware :
- Delete the previous configuration
- Aggregate two network ports (ens19 and ens20) and name the bond "bond0"
- Delete the previous Linux Bridge
- And finally, create a "vmbr1" bridge by checking the "VLAN-aware" box and indicating port aggregation with "bond0"
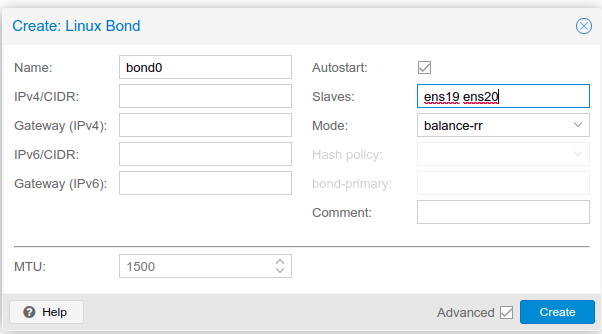
11-Linux Bond + Bridge + VLAN
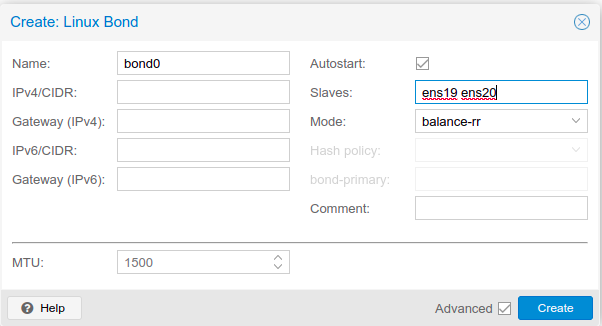
To create a Linux Bond + Bridge + VLAN :
- Delete the previous configuration
- Add a second network interface to your Proxmox VE virtual machine (ens20)
- Aggregate two network ports (ens19 and ens20) and name the bond "bond0" (note that the default mode is "balance-rr")
- Create a VLAN (VLAN 11) from "bond0"
- Finally, create a bridge "vmbr1" from VLAN 11
Here's the CLI configuration
auto ens19
iface ens19 inet manual

auto ens20
iface ens20 inet manual

auto bond0
iface bond0 inet manual
        bond-slaves ens19 ens20
        bond-miimon 100
        bond-mode balance-rr

auto vmbr1
iface vmbr1 inet manual
        bridge-ports vlan11
        bridge-stp off
        bridge-fd 0

auto vlan11
iface vlan11 inet manual
        vlan-raw-device bond0
So when you specify the Linux Bridge to your virtual machine, you don't need to specify the VLAN. The bridge is based on VLAN 11, which itself is based on an aggregation of two network ports (bond0).
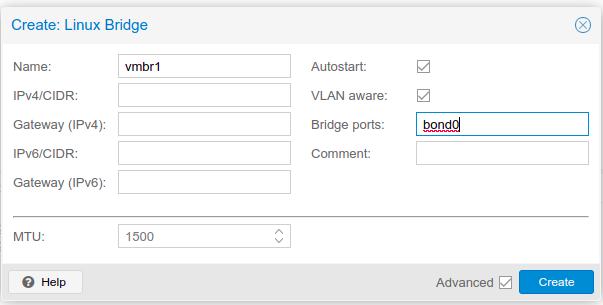
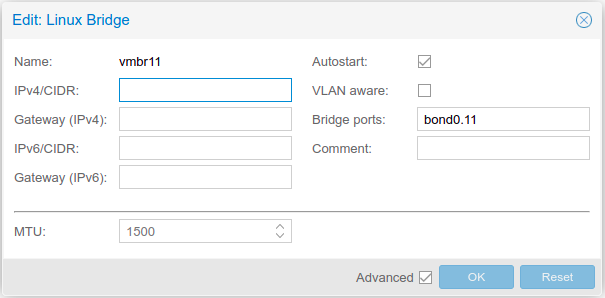
12-Linux Bond + bridge without VLAN
To create a Linux Bond + bridge without VLAN :
- Delete the previous configuration
- Aggregate two network ports (ens19 and ens20) and name the bond "bond0"
- Create a bridge "vmbr11" (for vlan11)
- Enter "bond0" in the network interface
- Just after "bond0", add a dot and the VLAN number (bond0.11 for VLAN 11)
If you've done everything right, you'll be a success story, as "the mussels from brussels" would say.

If you're having trouble, I'd advise you to brush up on your network basics, learn the protocols and standards by heart, and when you're ready, validate what you've learned with a certification like CCNA.