Initialize your virtual machines with Cloud-init on Proxmox VE
install cloud-init on your virtual machine and create template to automates your deployments


Contents:
- 1-What is Cloud-init?
- 2-Creating a template
- 3-Deploying a virtual machine
1-What's Cloud-init?
Cloud-init is a tool designed by Canonical to manage the initialization of a virtual machine in the cloud. On first startup, cloud-init will :
- Define user name and password
- Inject the SSH key
- Set the machine's network configuration (IP address, gateway, DNS)
All very appealing, isn't it? No more hassle of manually creating a virtual machine. As a famous french humorist would say: "beyond, it's a sun".

2-Creating a template
I invite you to export the "VM_ID" environment variable and set an identifier available on your server.
export VM_ID="900"Then upload a pre-configured cloud image to the Ubuntu servers. Rename this image "ubuntu.img" to avoid long names.
wget -O ubuntu.img \
https://cloud-images.ubuntu.com/jammy/current/jammy-server-cloudimg-amd64.img
Use the "qm create" command to create a virtual machine and add the following features:
qm create ${ID_VM} \
--name ubuntus2004 \
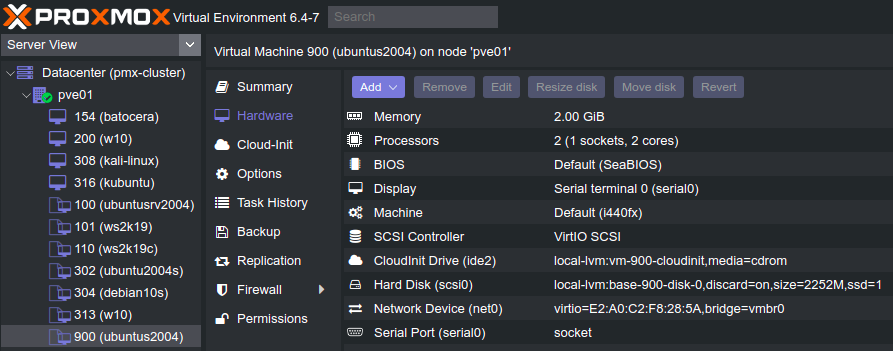
--agent=1,fstrim_cloned_disks=1 \
--machine pc-i440fx-5.2 \
--scsihw virtio-scsi-pci \
--core 4 \
--cpu kvm64 \
--memory 2048 \
--net0 virtio,bridge=vmbr0,firewall=1 \
--tablet 0- name: name the machine (ubuntu-server-2204 for the example)
- agent/fstrim: activate the QEMU agent to stop, start or restart the virtual machine. As for FSTRIM, it optimizes disk space by eliminating unused blocks. This option is activated when the virtual machine is migrated or the virtual disk is moved
- machine: Seabios is the default machine profile (equivalent to Legacy BIOS)
- scsihw: choose virtio-scsi as virtual disk SCSI controller
- core: allocate 1 core
- cpu: kvm64 for optimal portability and abstraction on all types of servers
- memory: allocate RAM (1 GB in the example)
- net0/bridge/firewall: add a virtio network card to the vmbr0 bridge (PVE's default bridge) and activate the firewall
- tablet: disable it as it consumes resources unnecessarily
Find out more about Virtio-SCSI and QEMU guest agent.
 Daniel Erez
Import the "ubuntu.img" file into the "local-lvm" volume to add it to the virtual machine.
qm importdisk ${ID_VM} ubuntu.img local-lvmName the new disk "vm-${ID_VM}-disk-0", not forgetting the discard and ssd options. For your information:
- SSD Emulation: tells the virtualized system that it's running on an SSD
- Discard: activates
qm set ${ID_VM} \
--scsi0 local-lvm:vm-${ID_VM}-disk-0,discard=on,ssd=1
Mount the cloud-init drive. This tool makes it much easier to configure virtual machines when they first start up.
qm set ${ID_VM} --ide2 local-lvm:cloudinitMake the virtual machine boot from the scsi0 disk.
qm set ${ID_VM} --boot c --bootdisk scsi0Finally, turn everything into a template that can be reused at will.
qm template ${ID_VM}Congratulations! You've got a ready-to-use template.
We've seen how to create a template from an Ubuntu and Debian cloud image.
Now we're going to look at how to deploy a virtual machine from a template and take advantage of the benefits offered by Cloud-init.
3-Deploy a virtual machine
Go to the template parameters, click on the cloud-init drive and add the following information.
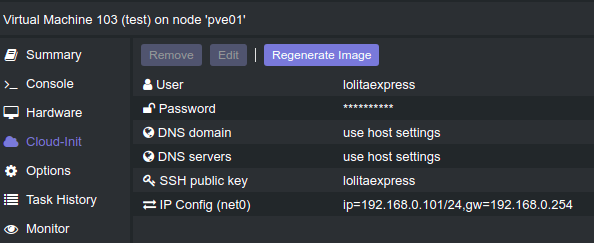
- User: your username
- Password: your password
- DNS Domain: optional (I put 1.1.1.1)
- DNS Server: optional (I put 8.8.8.8)
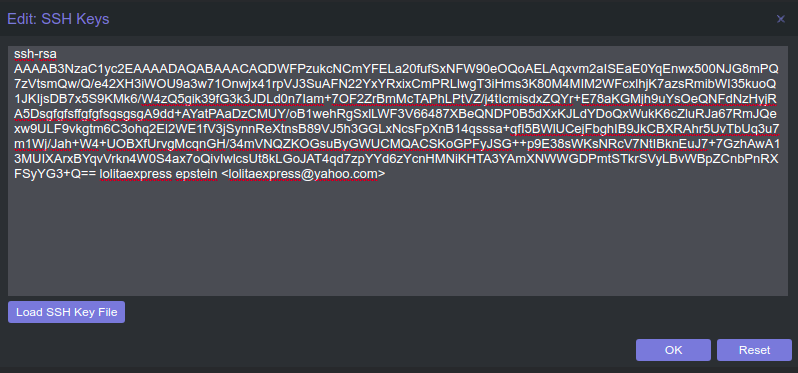
- SSH public key: your public SSH key (id_rsa.pub). On a Linux desktop distribution, type the following command and copy the contents:
cat /home/user/.ssh/id_rsa.pubAfter copying your public key, you can log in without a password with the command "ssh user@ipaddress", adding your username and IP address.
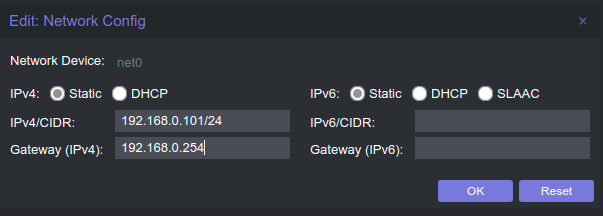
- IP Config: configure your IPv4 address and gateway (that of your Internet box).
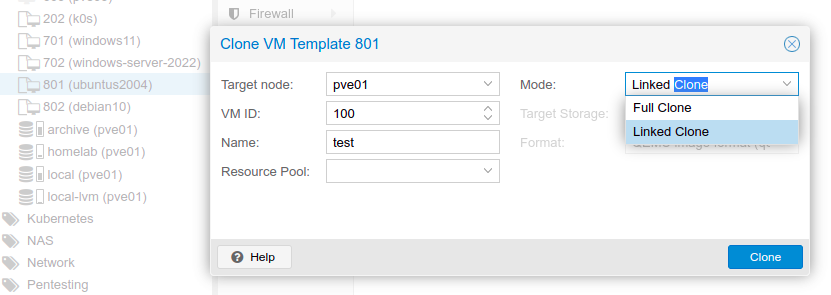
Right-click on the template, click on "clone" and give it a name. You'll have two choices:
- Full clone: 1:1 copy, independent of the template and therefore taking up the same amount of disk space
- Linked clone: a clone linked to the template. If the template is deleted, the linked clone will no longer function. Useful for testing, as it takes up less disk space
Click on "start" to run the virtual machine and.....
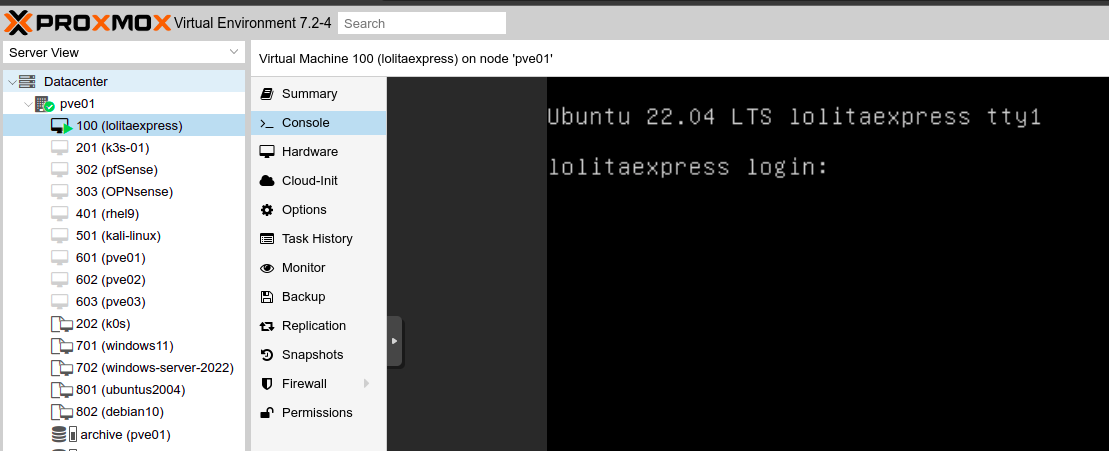
Congratulations!!!! You've passed your baptism of fire!!!!!

You'll be able to save a lot of time experimenting with all kinds of things in your homelab. On startup, cloud-init will automatically create the login and password, inject your SSH key, add network parameters and update the system. Handsome or not?
If you like my contents, follow me on:
- Discord: https://discord.gg/nhQzEDSx7x
- Instagram: https://www.instagram.com/technonagib/
- Reddit: https://www.reddit.com/r/technonagib/
- Twitter: https://twitter.com/technonagib