SATA and USB disks on Proxmox VE
Today we're going to look at how to add SATA and USB storage devices to Proxmox VE.


Contents:
- 1-Add a disk
- 2-Add a SATA device
- 3-Add a USB disk
1-Add a disk
Next step. You are about to learn how to add an additional disk (SSD, hard disk) to your server.
This will allow you to provide your Proxmox VE server with more storage space.
The context is as follows. You have a 32 GB SSD and would like to mount it as a directory on your server and, why not, make it available via the NFS protocol to other Proxmox VE servers and to your Linux virtual machines (which will be the subject of a future article).
To do this, plug in your disk, go to your server's terminal and type the command "lsblk", you should find the 32 GB disk under the name "/dev/sdb".
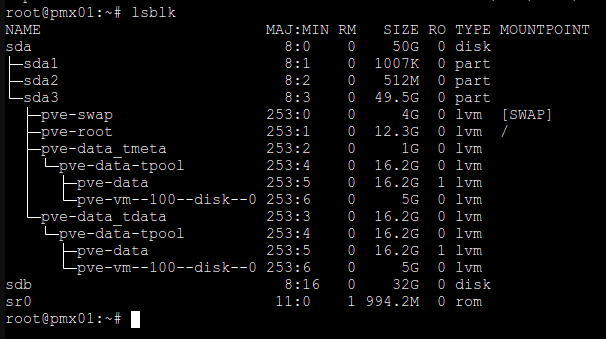
Via the web interface, you can locate it in "servername\Disks". Proxmox VE allows you to perform a disk wipe (deep formatting) as well as a SMART info check.

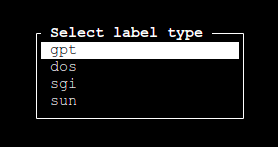
Type the command "cfdisk /dev/sdb" and select "gpt" as the label.

Click on "New" to create a new partition.

Confirm by pressing "Enter".

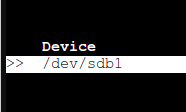
Remember the name of the newly created partition, which is "/dev/sdb1".
Apply the changes with "write", confirm with "yes" and exit with "Quit" to synchronize.


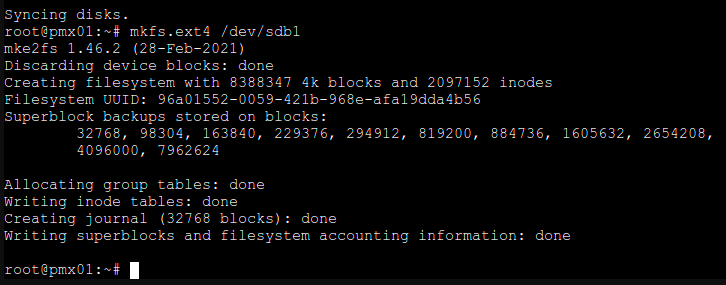
Proceed to formatting. Return to the terminal and type the command "mkfs.ext4 /dev/sdb1" (make filesystem ext4 /dev/sb1) to format the partition in ext4 format (the most common format on Linux).
Find out more about ext4 format.
 Contributors to Wikimedia projects
Now you need to make the volume accessible:
- Create a folder (e.g. storage1) in /mnt (mount, the most commonly used mount point on Linux)
- Mount the volume "/dev/sdb1" in "/mnt/storage1"

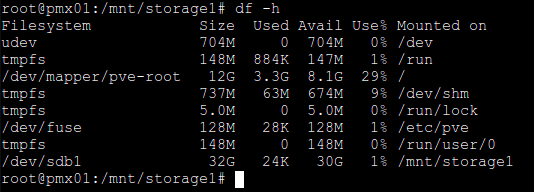
You can see with the "df -h" command that the volume is indeed mounted and is 32 GB in size.
The problem is that when the server is restarted, the volume will not be mounted automatically. To ensure that it is permanently mounted, you need to add a line to /etc/fstab.
You have two choices:
- Either specify the mount point (/dev/sdb1)
- or specify the volume identifier
Choose the second option, as it's the best practice. If you specify the mount point as "/dev/sdb1" instead of the identifier, and you change the disk location one of these days, the mount point may change (/dev/sdc1 or /dev/sdd1 for example) and your volume will be inaccessible (no crazy wasp).
To display the UUID of volume "/dev/sdb1", type the command "blkid /dev/sdb1".

Open the /etc/fstab file and add the following two lines, including the volume's UUID.
# <file system>                                 <mount point>   <type>     <options>          <dump>  <pass>
UUID="96a01552-0059-421b-968e-afa19dda4b56"     /mnt/storage1   ext4       defaults           0       2
Save changes with "CTRL+O", confirm with "Enter" and exit with "CTRL+X".

To better understand how to mount a volume in "/etc/fstab".

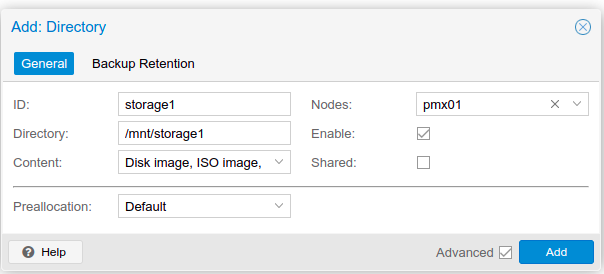
Finally, after adding the volume to /etc/fstab, go to "Datacenter\storage\Add\Directory" and add the volume.
- ID: the volume name (put whatever you like)
- Directory: mount point (/mnt/storage1)
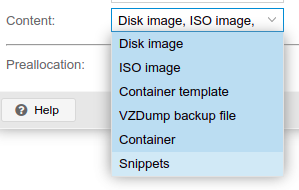
- Content: select all to save your installation images, virtual machines, templates and containers
- Nodes: specify only the host server that manages the volume, especially if you have a cluster. To share this directory with other members, use the NFS protocol instead
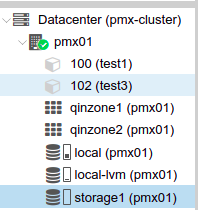
Congratulations, your volume is now visible on your server. You will now be able to back up
- Your virtual machines
- Your containers
- Your templates
- Your installation images
And share it with the rest of the cluster and your virtual machines via the NFS protocol, which will be the subject of a future article.
2-Ajouter un périphérique SATA
Next step. Here's how to :
- Add a SATA device
- Add a USB device
Passthrough a virtual machine under Proxmox VE.
For the first example, we'll add a SATA device to a Windows 11 virtual machine.
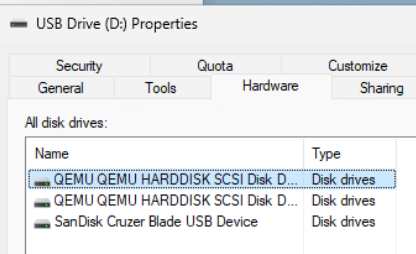
Note: as I don't have a SATA disk available, I'm going to use a USB stick instead (Sandiks Cruzer Blade USB 3.0; 32 GB)... The principle remains the same.
Windows recognizing FAT or NTFS, format the disk with the following command on PVE, knowing that :
- /dev/sda is PVE's main disk
- /dev/sdb is the secondary disk in my case, so be sure to check the location of your disk
mkfs.ntfs -f /dev/sdbNext, list all disks by ID with the following command.
ls -l /dev/disk/by-id/In this example, we can see the identifiers of the disks and partitions of the PVE server, including partition 1 of the USB key I've highlighted.


Once you've retrieved the disk ID, use the "qm set" command to specify :
- The virtual machine ID (121 for the example)
- The scsi drive number (2, as scsi1 is the virtual machine's main disk)
- And the partition ID (not the disk ID) after /dev/disk/by-id/DISK_ID
qm set 121 -scsi2 /dev/disk/by-id/usb-SanDisk_Cruzer_Blade_04003426111121060654-0:0-part1Confirm the command to add the disk. You can see in the virtual machine configuration that the partition appears as "scsi2".
Note: SATA passthrough does not allow the virtual machine to access SMART data on the disk, unlike USB passthrough.

Switch on the virtual machine and you should see that passthrough works.

For the rest of the tutorial, we'll continue using the Sandisk key and add a USB device.
3-Ajouter un périphérique USB
In the PVE terminal, type "lsusb" to list all USB devices, or do a grep with the device brand as in the example below.
root@pve02:~# lsusb | grep SanDisk
Bus 002 Device 003: ID 0781:5567 SanDisk Corp. Cruzer Blade
Then add the device to your virtual machine (121 in the example) with its ID.
root@pve02:~# qm set 121 -usb0 host=0781:5567Even easier. In PVE, go to virtual machine configuration and click on "USB Device".
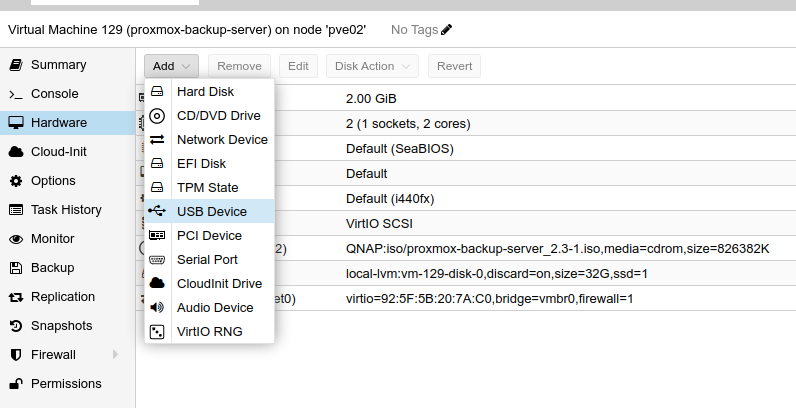
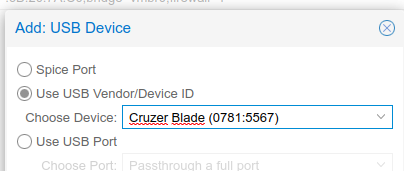
Select the USB device.
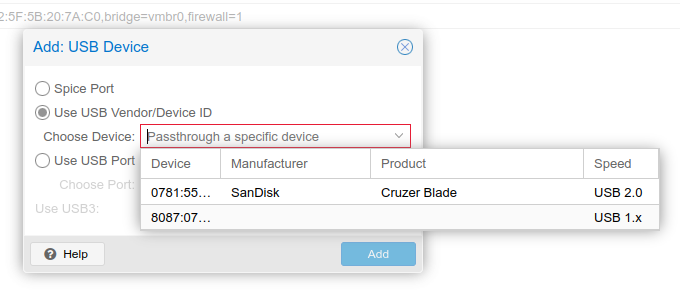
Click "ok" to confirm.
Note: for formatting, this applies to both USB and SATA devices.
Idem, see that passthrough works.
If you like my contents, follow me on:
- Discord: https://discord.gg/nhQzEDSx7x
- Instagram: https://www.instagram.com/technonagib/
- Reddit: https://www.reddit.com/r/technonagib/
- Twitter: https://twitter.com/technonagib