Emulating the serial port on Proxmox VE
Today we're going to look at how to emulate the serial port on Proxmox VE.


Contents:
- 1-What's a serial port?
- 2-Configuration
- 3-Simulation of a real-life case
- 4-Remote access
1-What's a serial port?
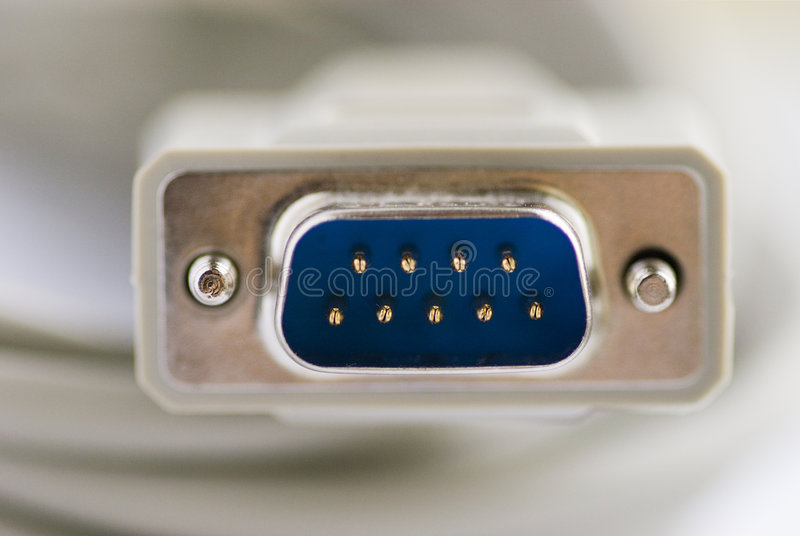
The serial port or COM port (RS-232) was a widespread connection between 1981 and the early 2000s, before being replaced by the USB standard.
In particular, it can be used to connect various peripherals (PLC, measuring device, etc.).
To find out more, click here.
 Contributors to Wikimedia projects
The advantage is that you can connect directly to a virtual machine just as you would with a physical machine.
You're going to say "what's the point? it's too old!!!! I can take control locally or remotely using the SSH protocol", and that's when I say "and if the SSH service fails? if you're away and important services are running in the virtual machine, how do you "cabron"?".

And I'm not even talking about cases of under-allocation of RAM or cores, which can lead to tragedy.
That's the whole point of the serial port: to enable you to get out of this kind of mess without bringing your virtual machine to a screeching halt.

2-Configuration
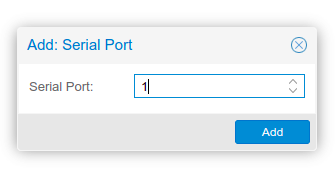
Nothing could be simpler. On your Proxmox VE server, simply add the serial port to Hardware/Serial Port, then start your virtual machine for it to be taken into account.


On a Debian/Ubuntu cloud-init image, this is already configured in advance.
On the other hand, on manually installed virtual machines, you'll need to modify the grub for this to be taken into account.
So, in your virtual machine, edit the /etc/default/grub file and add the following line to "GRUB_CMDLINE_LINUX".
# in /etc/default/grub change the GRUB_CMDLINE_LINUX parameter to
GRUB_CMDLINE_LINUX="quiet console=ttyS0,115200"
On my Manjaro instance, it looks like this, for example.

Then update the grub.
[sussudio@manjaro-xfce ~]$ sudo update-grub
[sudo] password for sussudio:
Generating grub configuration file ...
Found theme: /usr/share/grub/themes/manjaro/theme.txt
Found linux image: /boot/vmlinuz-5.15-x86_64
Found initrd image: /boot/intel-ucode.img /boot/initramfs-5.15-x86_64.img
Found initrd fallback image: /boot/initramfs-5.15-x86_64-fallback.img
Warning: os-prober will be executed to detect other bootable partitions.
Its output will be used to detect bootable binaries on them and create new boot entries.
Found memtest86+ image: /boot/memtest86+/memtest.bin
done
[sussudio@manjaro-xfce ~]$
3-Simulation of a real-life case
Let's simulate the case of a virtual machine whose SSH service fails:
- On my client workstation, I connect remotely via my Wireguard VPN and intentionally stop the virtual machine's SSH service (sshd.service)
- I disconnect from said machine
- And of course, I can no longer connect remotely or locally
sussudio@containers:~$ sudo systemctl stop sshd.service
nagib@containers:~$ exit
logout
Connection to 192.168.0.54 closed.
sussudio@ubuntu-desktop ~ ssh sussudio@192.168.0.54
ssh: connect to host 192.168.0.54 port 22: Connection refusedOn the terminal of my Proxmox VE server:
- I type the command "qm terminal 101" (101 is the VMID of the virtual machine) which emulates the serial port of a physical machine
- I restart the SSH service (sshd.service)
- I disconnect by pressing CTRL+O,
root@micro-srv-01:~# qm terminal 101
starting serial terminal on interface serial0 (press Ctrl+O to exit)

sussudio@containers:~$ sudo systemctl start sshd.service
sussudio@containers:~$ root@micro-srv-01:~#
Then, on my client terminal, I can connect to the virtual machine again.
✘ sussudio@ubuntu-desktop ~ ssh sussudio@192.168.0.54
Warning: Permanently added '192.168.0.54' (ECDSA) to the list of known hosts.
Welcome to Ubuntu 22.04 LTS (GNU/Linux 5.15.0-40-generic x86_64)
* Documentation: https://help.ubuntu.com
* Management: https://landscape.canonical.com
* Support: https://ubuntu.com/advantage
System information as of Fri Jul 1 11:01:30 UTC 2022
System load: 1.08935546875
Usage of /: 50.2% of 99.96GB
Memory usage: 42%
Swap usage: 0%
Processes: 275
Users logged in: 1
IPv4 address for br-32466dd87212: 10.2.0.1
IPv4 address for br-3ba832c50064: 192.168.90.1
IPv4 address for br-e7ae303cefa6: 172.18.0.1
IPv4 address for docker0: 172.17.0.1
IPv4 address for eth0: 192.168.0.54
IPv6 address for eth0: 2a01:cb00:82a5:3e00:6894:4aff:fedf:dc1c
* Super-optimized for small spaces - read how we shrank the memory
footprint of MicroK8s to make it the smallest full K8s around.
https://ubuntu.com/blog/microk8s-memory-optimisation
0 updates can be applied immediately.
Last login: Fri Jul 1 10:57:39 2022Very useful in everyday use, I can assure you, but few articles mention it. On the other hand, if it's your Proxmox VE server that's having a problem, you'll need an Idrac card if you have a physical server, or you can set up the Pi KVM project.
4-Remote access
If you've exposed your PVE server over the Internet (SSL certificate and 2fFA recommended), the serial port will be useful if you haven't set up a VPN server, as you won't be able to SSH into port 22 remotely.
If you've added the serial port as described in Chapter 2, and you launch the virtual machine, you should have this option available.
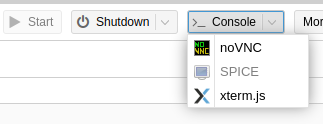
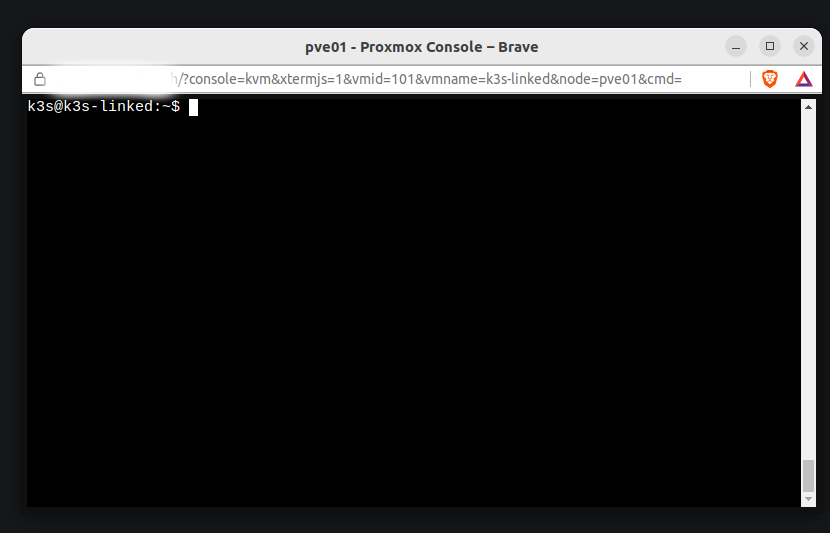
Click on "xtrem.js" and a window should open up, allowing you to remotely take control of your virtual machine and copy and paste.
No need to open a port on your Internet box, no need for a VPN server, just add the "serial port" option to your virtual machine.